fbpx

QA Tools: Tips and Tricks to Make the Most of Them

By GeaSpeak Team | 2023-05-23
QA Tools: Tips and Tricks to Make the Most of Them

Quality Assurance tools (QA tools) are pieces of software that help to improve the quality of a text while speeding up the turnaround time of a project. QA tools allow translators to detect errors that can easily go unnoticed, even when a thorough revision is made. They are used to make a superficial revision of the text, as they don’t show whether there are meaning errors.

Some features of QA Tools

Dictionaries are incorporated into QA tools to detect, for example, typos. Moreover, through rules or settings, they help translators with punctuation problems. For example, these tools can detect when there are:

  • Differences in punctuation between a source and a target segment.
  • Discrepancies in the target text regarding the punctuation required by the target language (a missing open or close parenthesis, or a missing opening question mark (“¿”) in the case of Spanish).
  • Inconsistency issues (for instance, the same source segments are translated differently).
  • Deviations (in the target text) from the glossary terminology (the target segment is missing the expected translation for a given term that the QA tool identifies in the source text).
  • Capitalization problems (a missing capital letter after a period or different words are in all uppercase in the source and target, which may be an acronym error).
  • Tag mismatches (a tag in the source is missing in the target or is in another position).
  • Grammatical errors (such as “del libros” -instead of “del libro” or “de el” -instead of “del”- in Spanish).

Another useful feature of QA tools is that they can be set up with specific rules to identify, for example, whether the translation contains a certain term which the client wishes to avoid, if there are potentially offensive words, or if the URLs were transferred when they were supposed to be localized, or vice versa.

Watch out for False Positives

A thing to keep in mind about QA tools is that sometimes they might flag false positives, so special attention has to be devoted to notice those cases where there seem to be errors but there aren’t. At the same time, we must take into consideration that we can be misled by false positives and introduce errors while trying to fix something that was not a mistake in the first place.

Popular QA Tools

From built-in CAT tool QA features to individual QA tools, there are many options to choose from. Among the most used built-in QA tools we can mention Trados QA and memoQ QA. As for those that come in a single package, Xbench is one of the best known. Other examples of widely-used QA tools are Linguistic Toolbox, QA Distiller, and Verifika QA.

Xbench offers two versions: one of them is free (Xbench 2.9) and the other one (Xbench 3.0) uses a subscription license model. Whereas the former lacks some features and support for new file formats and doesn’t handle strings internally in Unicode, the latter is an updated and improved version that supports Unicode and works well with recent operating systems.

How to use XBench:

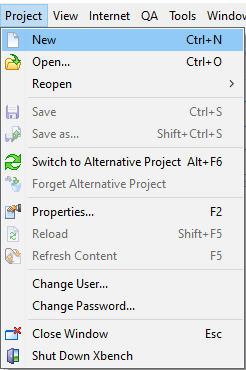
Open Xbench > Click Project > Select New.

Create a new project in XBench.

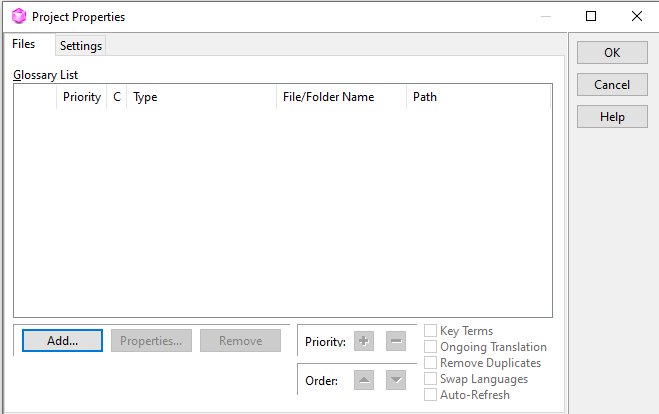
Click the Add button to add files.

Add files.

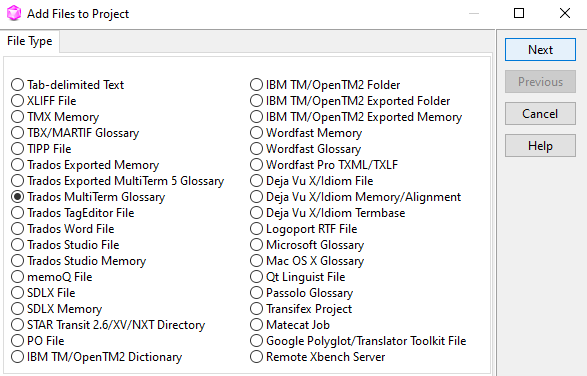
Select file type (in this case, Trados Studio File).

Selet file type.

Click Next and then Add File and select the files.

Add file.

Click Next again, select “Ongoing translation” and set Priority to “High”. Then click OK.

Select "Ongoing translation" and et priority to "High"

If you want to add a glossary to check the project terminology, this is the moment to do so. Click again on Add and select Trados Multiterm Glossary (if you are working in Trados and want to add a MultiTerm termbase):

Add a Glossary.

Click Next, then Add file, select your MultiTerm termbase, then click Next again, select Key Terms and change the priority to High:

Select Key Terms and set priority to High.

Then click Next and select source and target language. Then click OK.

Select source and target language.

Click OK and then OK again.

Select the QA tab and then click on Check Ongoing Translation.

Check ongoing translation.

If you need to add a specific configuration (checklist):

Click View > Checklist Manager and then click on the green + icon:

Add a specific configuration.

Then select the checklist file and click Open. Wait until you see the entries of the checklist on screen, like this:

You will see the entries of the checklist after you selected the checklist file and clicked Open.

After that, go back to the QA tab and continue with the process as you would normally do.

After clicking on Check Ongoing Translation, you will see a list of potential issues, like this:

List of potential issues

Go through all the issues to identify whether they are real issues (in which case you should go to the bilingual file to fix them) or false positives.

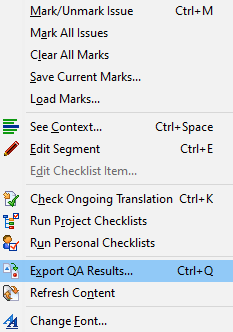
You can generate the Xbench report by right clicking on the list of issues and selecting Export QA results:

Export QA results

You will be able to select the location to save your report as well as to choose the file format (Excel, xml, txt or html).

Tips and Tricks to Run QA Reports

Here are some convenient suggestions to consider when working with QA tools:

Use time wisely

Be sure to allow enough time for the QA report as well as for the review stage. These processes may take you considerable time, depending on the project volume, the settings, the number of glossary terms (if any), among other factors.

Avoid inconsistencies before running the QA report

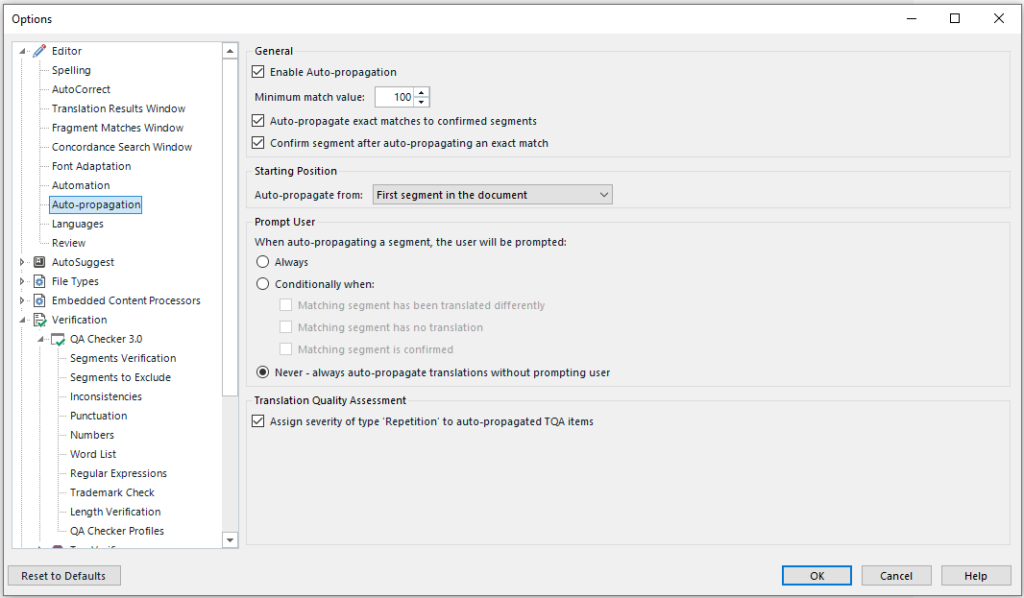
It is always better to be safe than sorry, so it is advisable to check out any possible errors, warnings or mismatches before they are flagged by the QA tool. To do this, it is a good idea to enable the Auto-propagation feature in the CAT tool so that all identical source segments remain the same in the translation. To activate self-propagation in Trados:

In the upper-left corner, go to File > Options > Editor > Auto-propagation and select these options:

Auto-propagation options
  • Enable Auto-propagation.
  • Set the minimum match value to 100. This will propagate only exact matches, i.e. when two segments are identical.
  • Auto-propagate exact matches to confirmed segments. This helps to ensure that all segments, confirmed or not, are propagated and remain the same, thus avoiding inconsistencies.
  • (Optional) Confirm segment after auto-propagating an exact match. It is up to you whether you want a segment to be confirmed or not after auto-propagation.
  • Starting Position > Auto-propagate from: First segment in the document. Selecting this option is important, because if you choose “Next segment in document”, you run the risk of changing only the following segments that are identical, and the previous ones will remain unchanged. On the other hand, if “First segment in the document” is selected, self-propagation will be performed both backward and forward and therefore all identical source segments will remain the same in the translation.

Be careful with similar segments

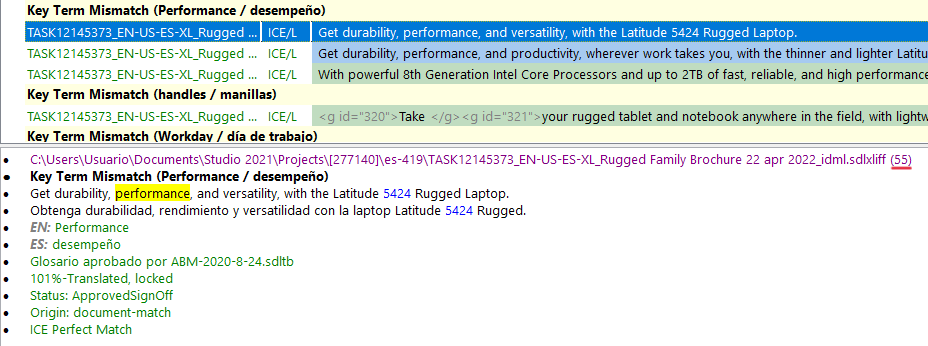
When reviewing the QA Report, Ctrl+F can be used to look for the phrase to be checked. However, when the text is slightly repetitive and there are many similar segments, it is better to check the segment number and go directly to it instead of using Ctrl+F. In Xbench, the segment number is shown below when you click on a segment, in parentheses, as shown in the picture (segment number 55 is underlined in red):

Segment number

Use Xbench Edit Segment shortcut and save time

Xbench has a convenient option to directly edit a segment. In case a real error is identified in the list of potential issues, click on the segment and select “Edit Segment“, or use the shortcut “Ctrl+E“. This will take you directly to the segment in question in the bilingual file instead of wasting time looking for it.

Directly edit a segment.

Refresh the QA report

After having corrected any relevant issues in the bilingual file, it is important to make sure that all real errors have been checked and corrected so that only false positives (if any) are shown in the report before sending the files to the client. To do this, right click on the list of files, select Refresh Content, and then click again on Check Ongoing Translation. The report will be refreshed and the errors that have already been corrected in the bilingual file will disappear.

Note: it is important to click Save in the bilingual file to make sure your changes are saved before selecting the Refresh Content option.

Refresh Content option

Use the “Mark” options

To ease the reading and review processes, Xbench allows you to “mark” and “unmark” potential errors. To do this, simply click on the potential error and select Mark/Unmark Issue, or press Ctrl+M. When an issue is marked, an X is displayed on the left, as shown here:

Mark options

You can choose to show or hide the marked issues with the Show Marked or Hide Marked options in the Filter Issues box. For example, if you want to focus on real errors and hide false positives, select the Hide Marked option and as you go through the list, select those that are false positives and mark them (using Ctrl+M). In this way, they will disappear from the list.

It is also possible to do it the other way around: mark only those that you consider to be real errors and select the Show Marked option.

Filter Issues: Show All

Note: When you use the Export QA Results command, the report will only include the issues that are displayed, i.e., if you click on “Hide Marked” and hide those issues, they won’t be included in the QA report, as it doesn’t export hidden issues).

Determine the scope of the QA process in Xbench

In the Options menu, you can decide which segments to consider, whether you want to check only new segments, exclude ICE segments or locked ones, or check only segments with a 100% match or higher. Moreover, you can also use the option to detect case-sensitive inconsistencies, and also use the case-sensitive function for key terms. Finally, you can choose to ignore tags.

Options: Only New Segments

The Options menu comes in handy for ignoring irrelevant segments. For example, if you have 100% match words out of scope in a project, it is preferable that the report doesn’t detect them. In this way, you will be saving time by avoiding long reports with lots of entries that don’t need to be reviewed and you will only see the relevant issues corresponding to the segments that you have in scope.